

Home About AnglerFish How to make lens profile Examples User manual Download Buy
AnglerFish user manual
User interface
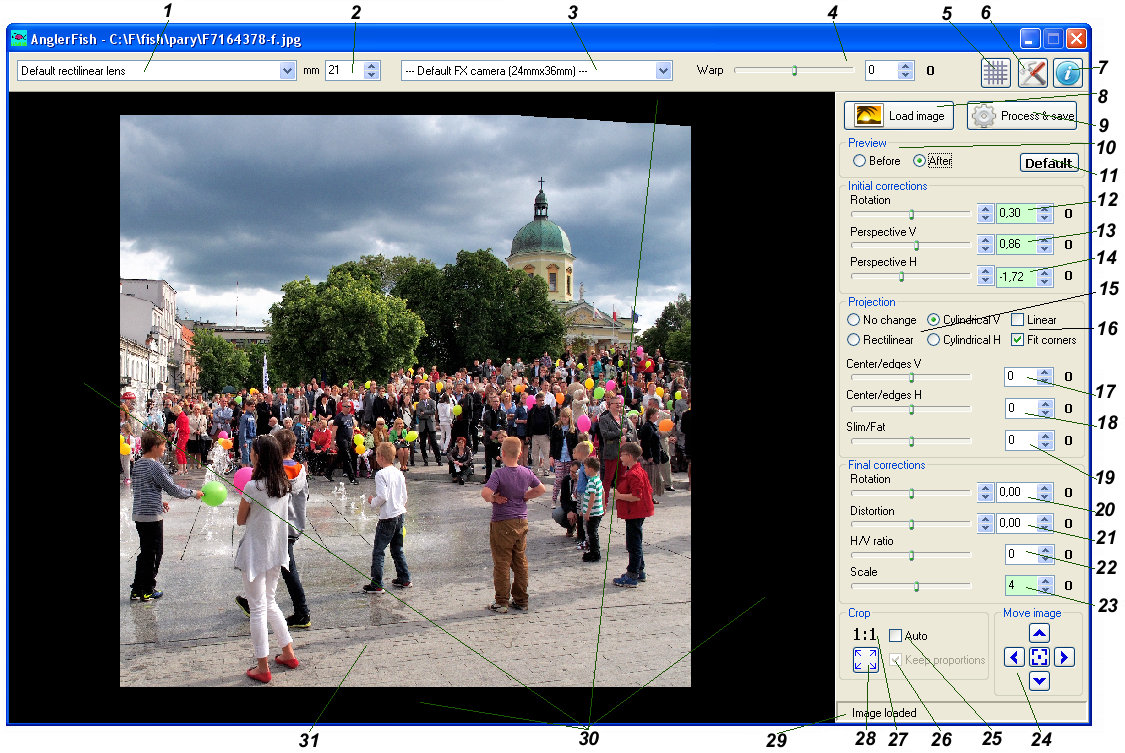
1. Lens choice. You can select default fisheye lens, default rectilinear lens and any of lens having a profile added to AnglerFish.
2. Focal length. This field is visible when:
- zoom fisheye is selected,
- default rectilinear lens is selected. In this case, focal length is needed by function converting picture to cylindrical projection.
3. Camera (body) choice. You can select any of predefined cameras or only sensor size.
4. Warp parameter corrects degree of fisheye distortion. This correction is needed when, for example:
- lens profile is missing, so other one was selected,
- wrong body was selected,
- real focal length is different than entered in field 2.
5. This button turns on and off grid lines.
6. Shows program options.
7. Shows About window.
8. Load image button. Program reads jpg and tif files (8 and 16 bit).
9. Process&save button. Image is processed, then saved in the same format, as original image (jpg as jpg and tif as tif). For tif images you can change bits per pixel from 8 to 16 or from 16 to 8, and turn on/off LZW compression.
10. Toggles image view: before and after corrections. This choice decides only what is shown in program window. Saved file is always processed and has all settings applied.
11. Resets all geometric settings to default values, cylindrical projection is choosen.
12. Initial image rotation.
13. Vertical perspective correction.
14. Horizontal perspective correction.
15. Projection:
- No change - select this option, when you don't want to defish image, and only other transformations are needed,
- Rectilinear,
- Cylindrical V with straight vertical lines,
- Cylindrical H with straight horizontal lines.
16. If cylindrical projection is selected, you can also set two additional parameters:
- Linear. On (default) is better, when there are people in the picture. On (sometimes with additional Slim/Fat correction) also can be better for architecture, because preserves straight radial lines.
- Fit corners. When off, image corners are stretched, but horizontal lines are straight. It can be useful for some images.
17. Center/edges V - values less than 0 expand top and bottom image areas and shrink center area. Values greater than 0 expand the center of image.
18. Center/edges H - as previous parameter, but horizontally.
19. Slim/fat - barrel or pincushion distortion is applied, but only in vertical direction.
20. Final rotation, applied after all other corrections.
21. Distortion correction. You can also add distortion effect to image.
22. Horizontal/vertical ratio.
23. Image scaling.
24. You can move an image in any direction (left, right, up and down) or reset image position (center button).
25. Auto cropping. Program cuts off all ampty areas. Program choice not always is accurate, especially when many deep transformations are made. In such a case you can turn off auto cropping and do it manually.
26. When this option is on, program preserves image proportions, to be identical in input and output images.
27. When cropped area proportions reach one of predefined values (in options window), it will be shown in this place. Black color means, that current proportions are equal (or almost equal) to displayed value. Grey color means, that proportions are near to that value.
28. This button moves cropping frame off the image.
29. Status line - in this area program messages and progress bar are displayed.
30. Cropping frame. Initially it is visible as narrow, grey frame around the image area. You can move it using mouse (place mouse cursor over it, then press and hold mouse button, and drag the frame). Frame changes color to dark grey or black, according to rules in point 27.
31. Cropped area can be moved by mouse.
Parameter setting
Every parameter can be changed in many ways:
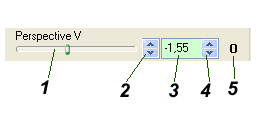
1. Move slider by the mouse. Selected value is placed in text field.
2. Increase or decreave value by 1.
3. Enter value directly into text field.
4. Increase and decrease value by smaller amount.
5. Reset value to 0.
Changed values are displyed on color background.
Typical workflow
- Press Load image and load jpg or tif file.
- Select lens, camera and focal length (if needed and field described as mm is visible).
- Select After and examine result image. Even if cylindrical projection is to be applied, you can switch temporarily to rectilinear - in this projection all bent lines are better visible. Apply Warp correction, if needed.
- Make perspective corrections and initial rotation. This is important for cylindrical projection, because only vertical (or horizontal) lines are straightened.
- Select desired projection. Default values are intended to give optimal results, but you can correct image geometry by Center/edges V, Center/edges H and Slim/Fat values.
- Apply final rotation, correct (or add) distortion, change H/V ratio and Scale image, when needed.
- Converted image can be moved in any direction. It is useful, for example, when in rectilinear projection, you want to enlarge and crop a small area of image.
- Now cropping. Let the program do it itself, or crop manually. Even when Auto is on, you can move cropping frame by mouse, but after any parameter change, program replaces it again.
- To reach optimal results, all parameters can be changed many times in any order. you can also experiment with any pairs lens+body.
- Save processed image. Program appends _af to file name by default. For jpg files you can select image quality. For tif images you can select 8 or 16 bits per pixel and switch on/off LZW compression. You can also choose, if only cropped area should be saved, or entire image (visible when cropping frame is off).
Batch conversion
Program allows conversion of many files with the same settings. It can be useful for movie defishing. How to perform batch conversion:
- Place all source files in one folder.
- Load one representative file in AnglerFish.
- Choose all settings, including crop.
- Open batch window (batch button is enabled, when image is loaded and After selected).
- Select desired options in batch window, confirm decision by checking Process all files and press Ok. Pressing Cancel stops batch task (after processing of current file).
- Program is converting all files from source folder (all with the same extension, as loaded file has - jpg or tif). Converted files are placed in folder AnglerFish, inside the folder with source images. If folder AnglerFish already contains files (for example from previous batch processing), they will be overwritten.
Movie conversion
To defish a movie, you must have a video editor, which allows writing all movie frames as separate files (jpg or tif), and makes a movie from image files again. What to do:
- Run your video editor and write all movie frames into one folder.
- Run AnglerFish and perform batch conversion, as explained above. When converting movie, you should pay attention to:
- crop: set the same proportions, as in source files (for example 4:3 or 16:9),
- image dimensions: check option Rescale result images to original dimensions.
Option Copy metadata and ICC profile can be off. Movie frames usually don't contain metadata, but when this option is on, program attempts to copy metadata for every frame, and it slowes down the conversion.
- Select all converted files in video editor and make a movie from them.